Onboard Plumbing: OFF GRID Water Systems
Having fresh water on board is a game changer—whether you're washing dishes in the woods or rinsing off trail dust before bed, it adds a layer of comfort that makes vanlife feel like home. While most modern builds include some form of onboard plumbing, the components, configurations, and install methods can vary widely.
From simple 5-gallon jugs with a foot pump to full pressurized systems with hot water and external showers, the best setup comes down to how you plan to travel. Do you need to winterize? Will you be off-grid for extended periods? Is stealth camping part of your routine? These questions shape the right plumbing system for your needs.
We’ve pulled together our go-to tips, tested setups, and recommended parts below—so whether you're starting from scratch or upgrading a basic system, you can plan your water flow with confidence.
Our Standard Plumbing Setup for Van Builds
When it comes to plumbing in a camper van, there are a few tried-and-true setups that we’ve found to be reliable, flexible, and easy to maintain. While every build is unique and sometimes requires different solutions, our “standard plumbing setup” has become a solid baseline that works for most projects. Below, we’ll walk you through the main components we use—fresh tanks, gray tanks, pumps, accumulators, how we handle winterization, and some key maintenance tips.
Fresh Water Tanks
Fresh water storage is the backbone of any van’s plumbing system. You’ll want a tank that’s durable, sized appropriately for your travel style, and easy to install in the space you have available. In most van layouts, it makes sense to store fresh water inside the van over one of your wheel wells. We typically work with a few trusted brands:
S&B Filters - Over the wheel well options in various sizes for Sprinters, Transits, and Promasters. We get most of our fresh and gray tanks here
Northwest Conversion - similar to the S&B tanks. Options for all the popular models.
Plastic Mart – Great for more customized builds when we need tanks in different shapes and sizes. They offer custom sized tanks for one-off projects and tons of options on rectangular/square tanks if that’s what will work best in your build.
Gray Water Tanks
Gray water storage (wastewater from sinks or showers) is just as important as the fresh, especially if you want to keep your build clean and campsite-friendly. We often recommend under-mount gray tanks to maximize interior space. Typically these get installed on the same side of the van as the galley - either on the driver side next to your gas tank or on the passenger side hugging the under side of your van’s step. The two brands we rely on most are:
Both companies offer comparable products. They are made for specific vans and are simple to install - no need to make custom brackets or dig for hardware, these products go up in a matter of minutes.
Pump + Accumulator
Once you’ve got water stored, you need a way to move it around your system. That’s where a pump and accumulator come in. A 12V pump pressurizes the water so it flows through your sink or shower just like it would at home, and an accumulator tank smooths out the water pressure, cutting down on pulsing and reducing wear on the pump. This video shows our typical plumbing set up.
We usually rely on a few standard parts for this, which you can check out on our Amazon Storefront. These options cover the majority of van builds, but it’s worth noting that different pumps may work better depending on your water usage, system size, and noise tolerance. Some builders prefer quieter pumps, while others want higher flow rates for shower-heavy setups.
Winterization
If you’re planning to travel or store your van in cold climates, winterization is essential to prevent damage. When water freezes inside your lines or fittings, it expands—and that can crack hoses, burst fittings, or even ruin your tanks. A little preparation saves you from costly repairs.
We recommend two main steps:
Blow Out the Lines – Use a blow-out valve to get water out of your lines. With an air compressor, you can push all remaining water out of the lines, reducing the risk of freezing. **Video link
RV Antifreeze – After blowing out the lines, many van owners also fill the system with RV-safe antifreeze. This ensures that even if a small amount of water is left in a low spot or fitting, it won’t freeze and expand in the cold. This is the best way to ensure nothing will freeze, but a thorough blow out can make the pink stuff uneccessary.
Between these two methods, you’ll have peace of mind knowing your plumbing system is protected for the winter season.
Seasonal Maintenance Checklist
Keeping your plumbing system in top shape isn’t just about winterization—it’s also about regular upkeep. A little preventative maintenance goes a long way toward avoiding leaks, odors, and pump failures. Here are a few things we recommend:
Sanitize Fresh Tanks – Every 3–6 months, flush your tanks with a mild bleach solution or RV sanitizing product to keep bacteria and algae from building up.
Inspect Hoses + Fittings – Check for cracks, leaks, or loose fittings. Replace anything that looks worn before it becomes a bigger problem. Your water pump will usually alert you to an issue. You should be able to leave your pump on and pressurized all the time. If it starts intermittently turning on, this means your system is compromised somewhere.
Clean Pump Strainer – Most pumps have a small mesh strainer to catch debris. Rinse this out periodically to maintain proper flow and pressure.
Drain Gray Tank Often – Avoid letting gray water sit for long periods, as it can develop odors quickly. P traps should keep the inside of your van smelling fresh, but you don’t want to let that gray tank become a breeding ground for bacteria. Rinse the tank with a mild cleaner when possible and try to avoid keeping gray water in it for extended periods of time.
Look for Seasonal Changes – In spring, after de-winterizing, check the system for leaks as water moves back into the lines. In fall, confirm everything is winterized before the first freeze.
By keeping up with these small tasks, you’ll extend the life of your system and avoid the headaches of unexpected plumbing issues on the road.
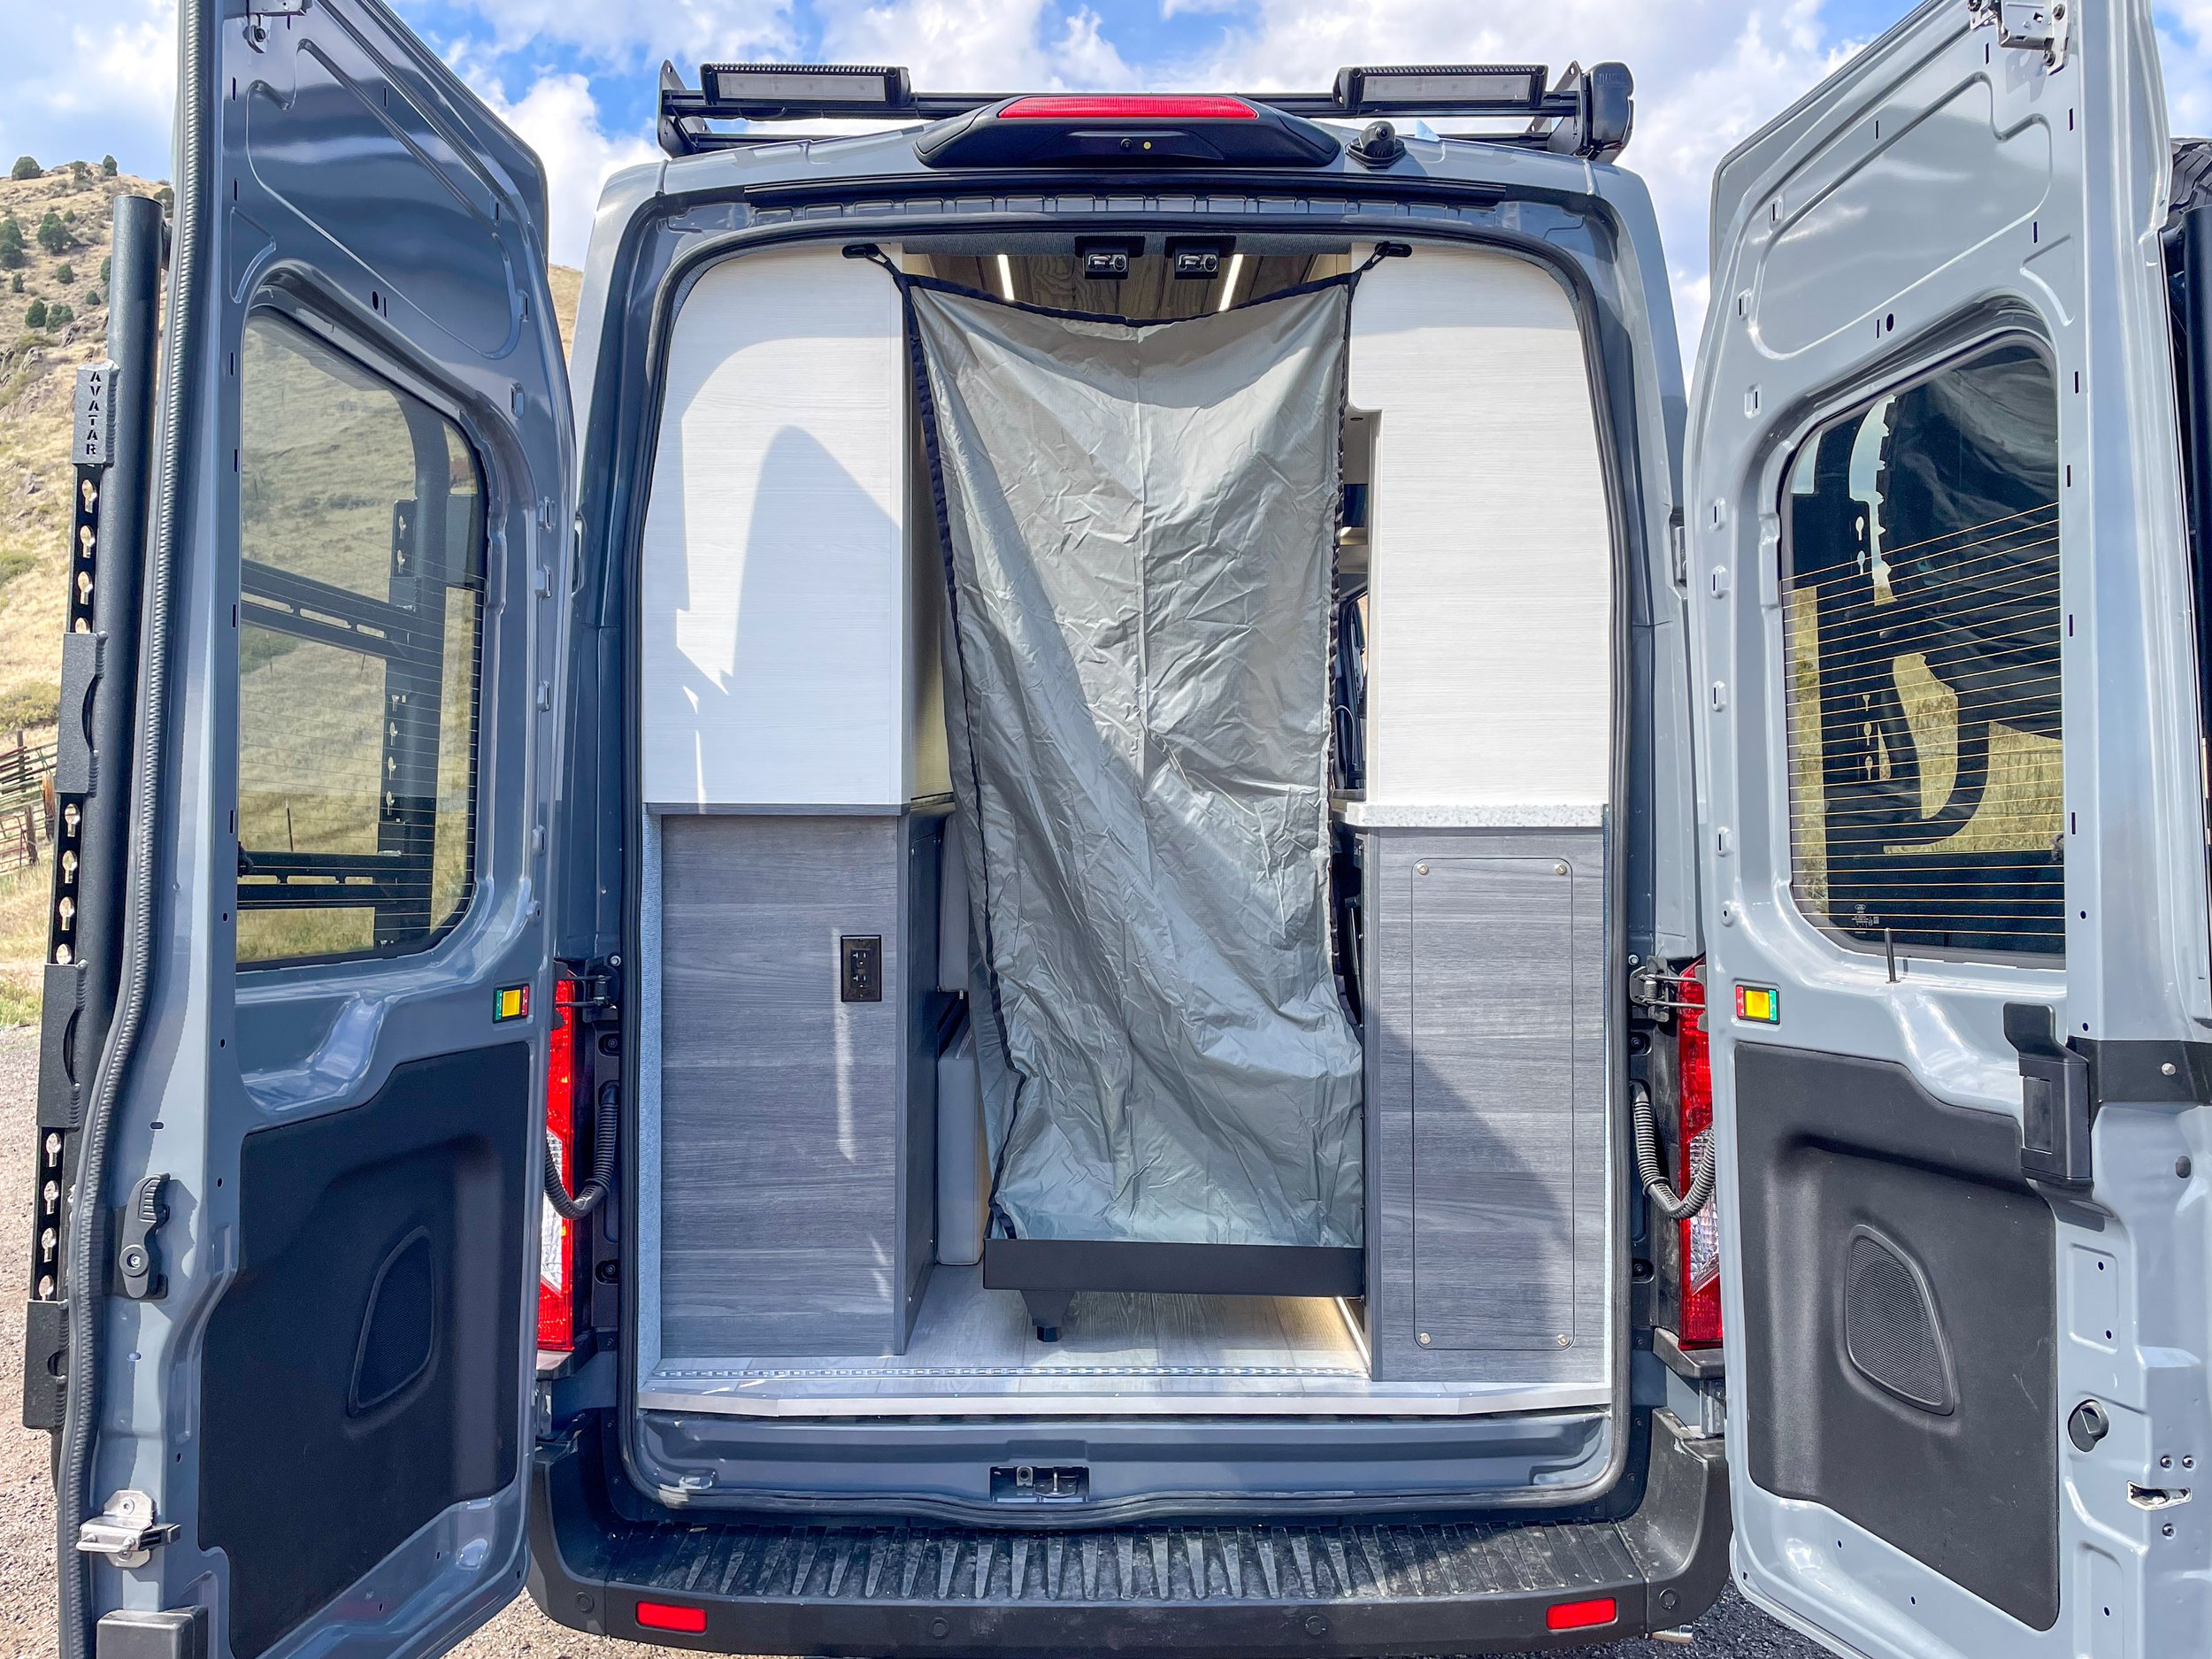
Indoor Showers: Comfort Meets Complexity
A dedicated indoor shower stall can bring home-level comfort to your van, but it comes with trade-offs.
The Pros:
You get privacy, warmth, and the convenience of showering inside—no campsite or gym stop required. For extreme sports athletes, the stall often pulls double duty as a drying room for wetsuits, ski gear, or soaked outer layers after a powder day.
The Challenges:
Water Seep: Fully sealing a shower to prevent leaks is tricky in a moving vehicle. Even small gaps can cause hidden damage.
Humidity: The van is a small space and running hot water through a shower puts off a lot of steam. You can mitigate some of this with fans and ventilation, but it’s definitely a factor to consider when building a shower into your van.
Weight: A framed, waterproof stall adds significant mass, affecting payload and fuel economy.
Space: Dedicating permanent floor space to a shower can limit layout flexibility. A lot of van shower stalls are big, expensive closets.
A Lighter Alternative:
Recent builds are trending toward fold-down or inlay shower pans with a pop-up curtain stall - check out Tetra Vans. These save weight and space while still giving you an enclosed area when needed. When not in use, the pan tucks away and the floor opens up, keeping the living space versatile.
If you’re in the water or snow regularly, the drying-room benefit can outweigh the downsides. For others, portable or outdoor setups might deliver the same function without the weight and build complexity.
Outdoor Showers: Simple, Light, and Versatile
Outdoor showers are the easiest way to add rinsing and bathing capability without eating into your interior space. They’re light, adaptable, and can be tailored to your style of travel.
Popular Options:
Rear Door Curtain (Van Essential): Creates a quick, private enclosure at the back of the van—ideal for rinsing off after the beach or a muddy hike.
Propane Hot Water Heater (Rear Door Mount): Instant hot water right where you need it. We don’t typically use propane, but compact unit like this mount to the rear door and connect to your water supply for an on-demand warm shower.
Quick-Release Shower Door in the Garage: An interior/exterior hybrid—sets up fast inside the rear storage bay for privacy and wind protection.
Roof-Mounted Road Shower: Uses solar heat to warm water throughout the day. Gravity-fed and energy-free, making it the most efficient off-grid rinse option.
Outdoor setups keep the weight down and eliminate the challenge of waterproofing your living space. They’re perfect for rinsing surfboards, bikes, dogs, or yourself before climbing back into the van.
Hot Water: Luxury or Necessity?
Having hot water in your van is one of those upgrades that makes life on the road feel a lot more like home. Whether it’s a quick shower after a long hike or simply doing dishes with warm water, the right water heating system can completely change your van experience. Over the years, we’ve worked with several options, but most of our builds that require hot water rely on hydronic heating systems powered by your vehicle’s fuel.
Hydronic Systems
Our go-to solution for hot water uses the Espar Hydronic system. These units run directly off your vehicle’s gas or diesel tank, so as long as you keep more than a quarter tank of fuel and have some power in your battery bank, you’ll have a steady supply of hot water and warm air all day. This is an efficient, compact, and reliable way to handle both cabin heat and hot water in one integrated system.
Rixen’s Enterprises – Premium Kits
When it comes to complete hydronic setups, Rixen’s Enterprises makes what we believe is the best all-in-one solution on the market. Their systems come with advanced controls that outshine anything else we’ve seen and are highly customizable.
Some standout features of Rixen’s kits include:
Vehicle coolant integration – capture heat from your engine to warm your water system and preheat your engine on those cold winter
Heated flooring – add radiant floor heating for maximum comfort.
Electric heating element – run the system combustion-free when you’re plugged into shore power.
This is, without question, the most expensive option—but if you want a top-of-the-line heating and hot water setup with flexibility and superior controls, Rixen’s is the way to go.
Esparparts.com – Mid-Range Kits
For those looking for a slightly more budget-friendly option without sacrificing quality, esparparts.com offers comparable kits. They’re an authorized Espar distributor in North America and have decades of experience selling and servicing these systems. While the system control and feature set isn’t as comprehensive as Rixen’s, these kits are solid, reliable, and often a better fit for builds where cost is a bigger factor.
Heatso – Budget Kits
At the more affordable end, Heatso sells genuine Espar heater kits at lower prices. The catch: they’re not an authorized Espar/Eberspächer distributor. That doesn’t mean the products aren’t real—just that warranty support and service can be more complicated.
We actually run one of these kits in our rental van, and it performs great. That said, if you’re not comfortable doing your own troubleshooting or repairs, it may be worth spending the extra money on a kit that’s backed by manufacturer support.
Electric Water Heaters
If you don’t need warm air in your van—or you know hot water will only be an occasional luxury—an electric water heater can be the right choice. These units are:
Cheaper upfront than hydronic systems.
Combustion-free, which makes them simple to use.
Plug-and-play friendly if you’ll be spending time at campgrounds with shore power.
The tradeoff is that they take up more space inside your van and require a large battery bank if you want to run them off-grid. For minimalists or weekend travelers who don’t need a full hydronic setup, though, this is often the most practical solution. Here are a few we’ve installed in the past:
Isotherm Slim Square - Electric water heater with the option to connect to your vehicle’s coolant loop.
Bosch Electric Water Heater - Standard house units that are budget friendly but take up a lot of space and can be hard to winterize. These come in 2.5, 4, and 7 gallon options. Just be sure to install it with a plan to winterize.
Which System Is Right for You?
Full-time travelers, cold climates, or luxury builds → Rixen’s Hydronic System
Balanced performance and budget → Esparparts.com kits
DIYers who can handle service themselves → Heatso kits
Occasional hot water needs, frequent shore power access → Electric water heater
Choosing the right system comes down to how often you’ll use hot water, whether you need cabin heating as well, and what budget you’re working with.
Drinking Water: From Simple Jugs to On-Tap Filtration
For short trips, the easiest option is to bring separate jugs of drinking water from a grocery store or gas station. It’s quick, cheap, and avoids any concern about what’s in your fresh tank—especially if you fill that tank with standard hose water for washing, dishes, and showers.
If you’re living in your van long-term, having filtered water on tap can be a big upgrade. It saves space, cuts down on plastic waste, and gives you peace of mind about what you’re drinking.
Filtration Options:
There are plenty of systems on the market, but a standout for ease of install, winterization, and multi-stage filtration is the Guzzle H2O Stealth Flex 5. It mounts neatly in a plumbing cabinet or under the sink, connects in-line with your cold water feed, and filters on demand. We have also used a few UV water filters like the Acuva which is low profile and gives you the option of a filtered tap without taking up too much space. There are also multi stage filter options that we’ve done in the past, but they often take up more space and cost a pretty penny.
The choice comes down to trip length and lifestyle:
Weekend Warrior: Separate jugs, keep it simple.
Full-Timer: Install a filtration system so you can drink directly from your tank with confidence.
Going All Out: Plumbing Upgrades for the Ultimate Build
If you’re building your last van and want a system that covers every convenience—no future add-ons required—these upgrades can take your plumbing from good to great:
Blow-Out Valve: Makes winterizing fast and simple. Clear your lines with compressed air before freezing temps hit. (See our installation video)
Tank Monitoring: Know exactly how much water you have at all times.
Victron Cerbo/Ekrano with tank sensor for integrated system monitoring. Check out this video for a more detailed expanation. Gauge mounts directly to the tank—height varies with your tank size.
Standalone Tank Gauge: If you don’t have a Victron system that can display tank levels, you can use the same tank guage with a standalone tank monitor to check how much water is in your tank(s).
Automatic Draining: Flip a switch and your tank empties itself—no crawling under the van or pulling drain plugs. We typically use these US Solid motorized ball valves for automatic tank draining.
For those sparing nothing, these features remove the guesswork from living on the road, so your plumbing system just works—quietly, efficiently, and without hassle.
Helpful Resources
When you’re planning or refining your van’s plumbing system, tapping into other builders’ experiences and using the right tools can save time, money, and frustration.
This video from explorist life shows how to connect a standard water pump system to a water tank (skip to around 1:40).
Serg Supply also put together a nice video explaining some of the common issues builders run into with plumbing fittings and highlighting some parts to use with a basic jerry can system.
If you want a deep dive with more available features, this video from Thrivans goes into pretty much all of the features you might put into your van plumbing system.