Exterior stuff - Make your van Mean!
Exterior mods are where your van starts to show its personality. Racks, lights, bumpers, windows, tires, and suspension aren’t just functional—they’re how you make your van yours. They change the way it feels to drive, the way it’s seen on the road, and the way it meets the challenges of the places you take it.
These upgrades add versatility and durability, giving you more options for carrying gear, protecting your investment, and handling rough terrain. But they also bring a certain presence—a look that says your van is ready for anything. This is the fun part, the nice-to-have that can turn a good build into something unforgettable.
Roof Racks
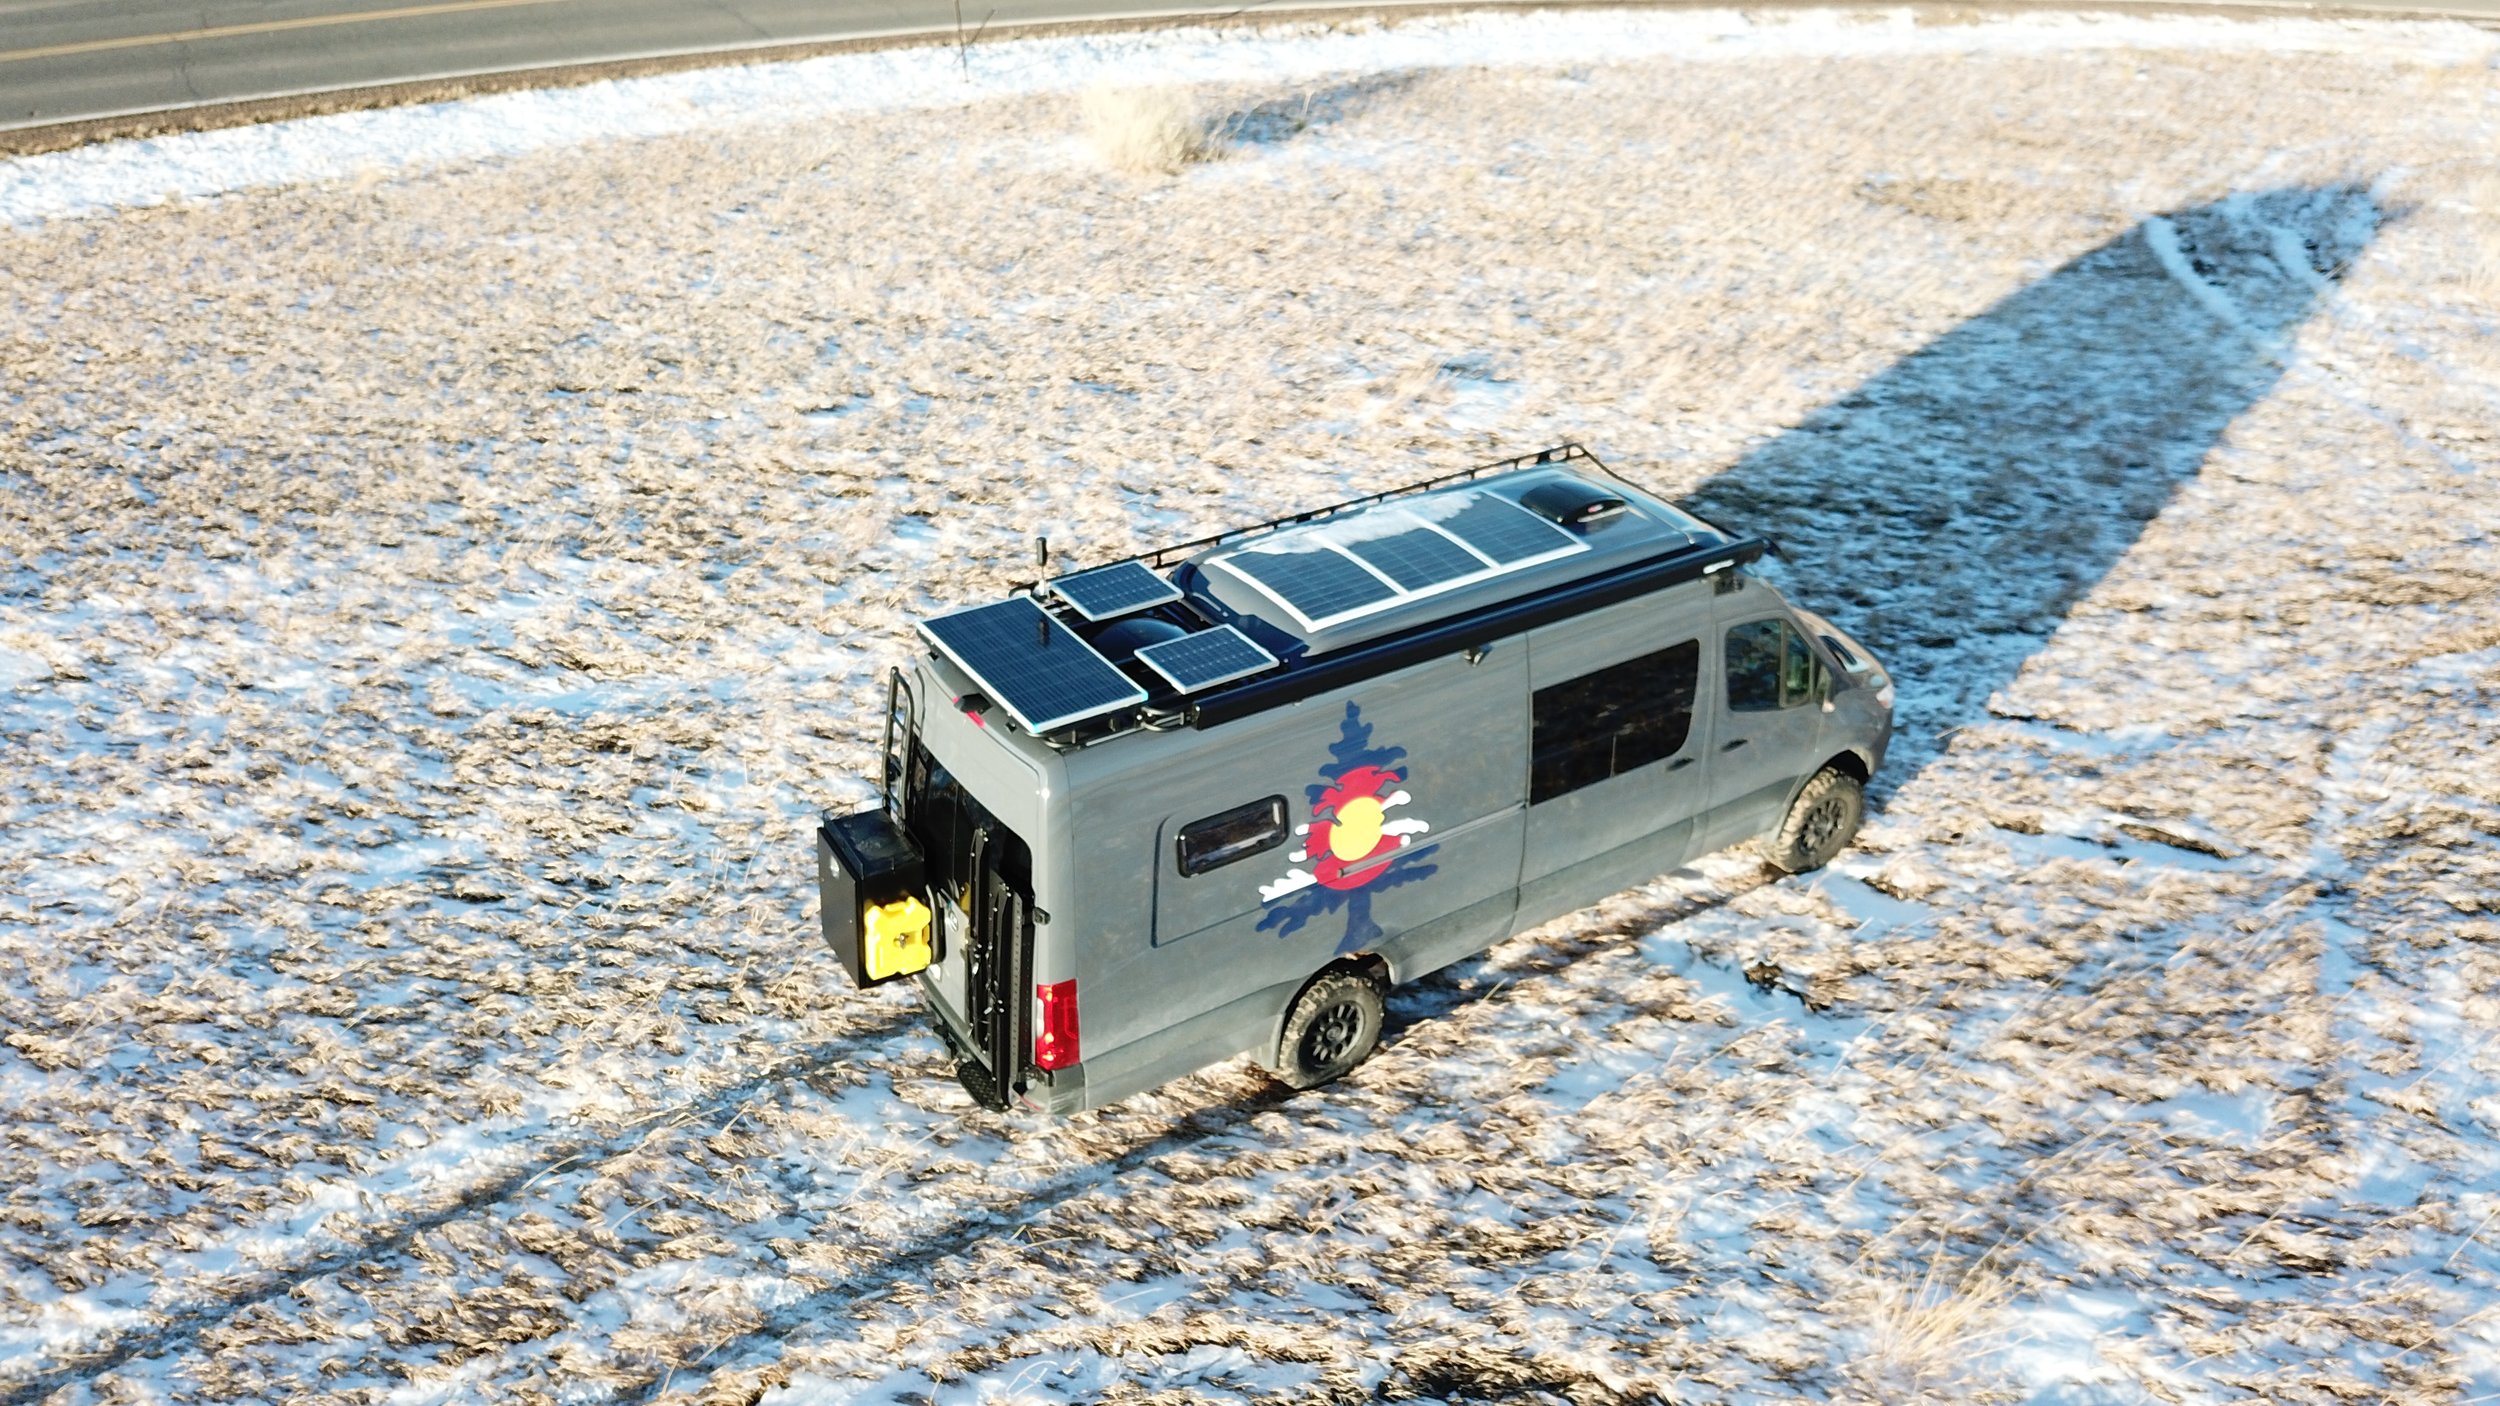
A roof rack is one of the most functional—and visually defining—exterior upgrades you can put on a van. Beyond looking sharp, a good rack expands what your van can carry and how you can use your roof space. From solar panels to gear boxes, kayaks to decking for a sunset hangout, the roof rack turns wasted space into a hard-working platform.
Modern high-end racks, like those from Flatline Van Co, Aluminess, Orion, and Owl Vans, are laser-cut for precision and designed to follow the exact contour of your roofline. This gives them a clean, factory-level fit that’s as aerodynamic as it is stylish. Many are modular, so you can add or reconfigure panels, crossbars, and mounting points as your needs change. The result is a streamlined, versatile system that looks as good empty as it does fully loaded.
For a simpler, more cost-effective approach, crossbar systems from Yakima, Thule, or even off-brand Amazon options get the job done. They’re perfect for basic mounting—think a cargo box for extra storage or a solar panel setup—without committing to a full platform rack.
Older trade vans often relied on rain gutter mounts, but most modern vans now use factory in-laid bolt mounting systems. This change has opened up more precise and secure attachment options, reduced wind noise, and made installation cleaner and easier. DIY vans has cross bars that attach to each of the major vans if you’d rather go for a few cross supports than a full rack.
A well-chosen rack blends form and function—whether you’re going all-in with a contoured modular platform or keeping it minimal with a couple of crossbars.
Awnings
An awning is one of those upgrades you don’t truly appreciate until you use it—then it’s hard to imagine life without one. It instantly expands your living space, creating shade on hot days, shelter from rain, and a comfortable spot to cook, relax, or gear up before hitting the trail.
Modern awnings from brands like Fiamma, Thule, and ARB are designed for quick deployment, smooth operation, and durable performance in all kinds of conditions. Many integrate directly into roof rack systems, keeping them secure and out of the way when stowed. Others mount directly to the van’s factory in-laid bolt points, which keeps installation clean and minimizes the need for drilling. Here at CAV we install Fiamma products (check out this blog for more info).
You’ll find two main styles:
Manual roll-out awnings – lightweight, cost-effective, and quick to set up.
Powered awnings – extend or retract with the push of a button, ideal for frequent use or solo travelers.
For budget-friendly setups, smaller batwing or canopy-style awnings offer a lot of shade for their size and can be mounted to basic crossbars. This blog gives a good breakdown of the options for each van.
An awning doesn’t just make your campsite more comfortable—it changes the way you use your van. Whether you’re lingering over morning coffee in the rain or cooling off after a summer ride, it’s a simple piece of kit that makes outdoor living more inviting.
Windows
Few upgrades influence both the look of your van’s exterior and the quality of your interior experience as much as windows. They frame your views, bring in natural light, improve ventilation, and give your build a more open, inviting feel. From the outside, they can make a van look sleek and purpose-built—or mismatched and dated—depending on the choices you make.
We recommend avoiding the cheapest options. Saving a little up front often leads to headaches later—whether it’s leaks, poor insulation, or simply not being happy with how they function or look. Investing in high-quality windows will pay off in performance, durability, and satisfaction over the life of your van.
Some of our trusted sources include:
Van Windows Direct – broad selection, good availability.
Campervan HQ – carries multiple brands and specialized models.
Tern Overland – premium windows with excellent insulation and airflow control.
CR Laurence – industry standard in many professional builds.
AMA – well-regarded for quality and fit in modern van conversions.
Whether you’re adding a single vented window near your bed or installing a panoramic row along the side, choose windows that complement your build’s style, meet your climate needs, and stand up to the miles ahead.
We’re always happy to help out with window installs, but if you plan to tackle the job yourself here are a few resources to make sure you get it right the first time:
Bumpers, Lights & Winches
Upgrading bumpers and adding auxiliary lighting changes both the look and the capability of your van. A well-designed bumper offers protection from impacts, a mounting platform for lights and/or a winch, and a more rugged, adventure-ready presence on the road. Pair that with strategically placed lights, and you’re not only safer after dark—you’re more prepared for off-road travel, remote campsites, and recovery situations.
Bumpers
Brands like CATuned, Flatline Van Co, Owl Vans, and Aluminess build bumpers that are engineered for strength without adding unnecessary weight. Many designs integrate clean mounting points for LED light bars, spot lights, or driving lights, giving you targeted illumination for trail driving or nighttime setup.
Lights
Whether you want upgraded fog lights, roof rack mounted off road brights, or just some nice grille mounted accent lighting, the right products can make all the difference on the road and at camp. Rigid and Baja Designs are the main manufacturers used in the van industry. We have used other parts, but these two companies offer a ton of options to light up all sides of your vehicle.
Winches
If you spend time off-road or in remote areas, adding a winch can be a smart insurance policy. Integrated winch mounts keep the installation tidy, while still giving you the pulling power to self-recover—or help someone else—when the trail gets tricky. Warn winches are somewhat of an industry standard (and they integrate with a lot of aftermarket bumpers), but Mile Marker makes a portable winch that gives you a cheap option that hopefully you never need to use but can keep on board just in case.
Done right, bumpers, lights, and winches work together: protection, visibility, and recovery all in one package. And they make your van look like it means business, whether you’re rolling into a trailhead or driving through town.
External Gear Storage
External storage is all about freeing up space inside your van while keeping your gear protected, secure, and ready to grab when you need it. Whether it’s a cargo box for camp chairs and cooking gear, a bike rack for weekend rides, or a ski box for winter trips, sturdy mounting and weatherproofing are key.
The best systems offer weather protection to keep your gear dry, theft resistance to keep it safe, and solid mounting so it stays put on rough roads. External storage is also perfect for muddy or wet items—keeping them outside the living space means your van stays cleaner and drier inside.
Brands like Flatline Van Co, Flarespace, Owl Vans, Avatar Offroad and Aluminess offer a range of solutions, from side-mounted storage boxes and rear swing-out carriers to roof-mounted cargo systems. Many can also integrate specialty mounts for boats, bikes, skis, or boards, so your adventure gear travels safely and securely.
With the right setup, you can carry more, worry less, and keep the inside of your van feeling open and livable—no matter how much gear the trip calls for. Need help with install? Send an email to info@coadventurevans.com with your ideal gear upgrades and we’ll get you sorted out.
Side Steps:
Side steps make getting in and out of your van easier, especially for passengers, kids, or anyone hauling gear. They also protect your rocker panels from road debris and give the van a more finished, adventure-ready look.
Brands like Flatline Van Co, Owl Vans, and Aluminess offer steps designed specifically for each van model—ranging from low-profile options that blend seamlessly with factory body lines to heavy-duty, off-road-ready versions built for maximum grip and durability. If rugged off-road performance isn’t your priority, there are plenty of more affordable commercial options available. For a touch of convenience, Amp Research also makes a powered step that we have installed on a number of vans—just keep in mind that electric steps can be prone to issues if exposed to excessive road grime or used improperly.
Whether you choose them for function, style, or both, side steps are one of those small upgrades that you and your passengers will appreciate every time you open the door.
Wheels, Tires & Suspension
Wheels and tires influence everything from ride comfort to traction, and suspension upgrades can take your van from a stock people-mover to a road-trip-ready adventure rig. The right combination improves handling, expands terrain capability, and elevates the van’s stance for a more confident look.
Transit – Quigley’s QLift is the gold standard for Transit suspension upgrades. It is Ford certified so it keeps everything within warranty specs. Van Compass also offers Ford Transit kits. These are still very high quality and are more budget friendly, but they don’t have the same warranty certification.
Sprinter – We typically recommend an Agile Offroad RIP kit for Sprinter suspension upgrades. Agile offers a dampening package, standard RIP kit, and Pro RIP kit package that give Sprinter owners options depending on their budget and use cases.
Wheels and Tires
Exact fit depends on van model and suspension setup, but:
16–17” wheels are the standard upgrade size in most cases
Larger wheels/tires require suspension modifications and often material removal in the wheel wells to prevent rubbing.
Van Compass has put together a super helpful guide for wheel and tire specs on the most popular van models
Every van is different, but our favorite combo on most vans is Black Rhino wheels with some BF Goodrich KO3 tires
We use 5280 Sprinter Service and Tourig for wheel, tire, and suspension work on our adventure vans, offering everything from bolt-on upgrades to fully tuned systems for long-distance travel and off-road performance. Want to get your suspension upgraded? Reach out to info@coadventurevans.com to get the ball rolling on your off road upgrades.
Starlink on the Road
Reliable internet, anywhere with sky above. Starlink has become a go-to for vanlife connectivity—but it helps to understand the options before installing.
Mini vs. Standard
Mini: Smaller, lighter, draws less power (~20–30W). Great for basic use and stealth setups.
Standard: Higher speeds and broader coverage (~40–60W). Ideal for remote work and media-heavy users. Takes up more space on your roof and requires mounting a power supply and router inside.
Mounting Options
Dashboard: Surprisingly effective for some while driving—though not official.
Roof Mount: Clean and convenient, just watch for trees.
Tripod: Portable and flexible for long stays or forested areas.
Power & Use Tips
Power Draw: Manageable with solar, but overnight use adds up.
Smart Use: Many users turn it off when not in use or while sleeping.
Watch the Data: Starlink’s Roam plan is great for infrequent use - $50 for 50GB/mo. Just be sure to watch the data usage or upgrade to their unlimited plan.